Techniques for Aging Paper               Reprinted from the web
January, 2004

Paper often needs a little work before it's the perfect addition to a project. One of the things I am most often asked is how to effectively age paper. There are quite a few techniques for this, so I'm just going to give a quick description of those I've tried---when you have some spare time, grab some scrap paper and test them yourself to find your favorite:

  1. Walnut ink crystals and water make a great aging combination. Mix up some crystals with water to the desired level of darkness, and apply to the paper: paint it on, dab it on with a sponge, dip the paper in it, or use any creative application method you come up with. They're all good! Dropping a few crystals directly onto the dampened paper creates an interesting effect, too. I have not tried this one but heard it is good
  2. Similarly, tea and coffee can both be used as aging mediums. As with walnut ink, simply brew tea or coffee to the desired strength, and then apply with the method of your choice. Wet tea bags can be used as applicators for an extra bit of blotchiness.
  3. Grab your dye ink pads and apply them to paper directly. Pat or drag the pads across the paper to apply color. To get a little texture going, lay the paper onto a surface with sand or gravel on it (my garage floor gives a great texture if it hasn't been swept recently).
  4. Roll a brayer over an earth-toned dye ink pad, and then spritz the roller here and there with a little water. Roll over paper or tags. This can be done in layers using different colors if desired.
  5. I love glazes! I do have some Golden acrylic glazes, but I also like glaze medium and plain old cheap acrylic paint. Mix using more glaze than paint, and apply with the tool of your choice: brush, sponge, wadded up paper towels or fingers. When you're going for age, make sure to choose matte glaze rather than glossy.
  6. For paper that looks burned, my favorite technique uses lemon or lime juice and a heat gun. Dab the juice onto the edges of the paper, then heat. The more you heat, the darker the burn marks become. This technique takes a little practice, but the effect is well worth the time. For a more complete lesson in doing this technique, look below.
  7. Chalking is a very simple way of aging paper. Tear the edges of the paper, and then drag chalks or pastels along the torn edge. Blend with your finger or a cotton swab.
  8. Wrinkles are good! Spritz your paper with water, and crumple it into a ball, then flatten it out again. If you want it really flat, try ironing it lightly. Use as is, or apply any aging technique. To simply define the wrinkles a bit, try dragging a Versa Mark pad over the surface.
  9. To age patterned papers, try a bit of fine sandpaper or some steel wool. Rub over the edges of the paper to dull or remove the pattern.
  10.  

Lemon Juice Burning
January, 2004

Materials:
Paper
Lemon or lime juice
Plastic container
Paintbrush
Sponge
Heat gun
Tile

How to do it:


Tear the edges of your paper for a ragged effect. Pour a little lemon juice into a plastic container, and brush or sponge around outer edge of paper. Juice might also be splattered or sponged across the full sheet---try a couple of practice sheets to see what happens.

Place juicy paper on a piece of tile. Begin heating with heat gun. Keep gun moving slowly. Paper will begin to brown in places that have been painted with juice.

Continue heating juice until paper has browned to your satisfaction.

An example of a finished book layout using juice burned papers.


I've received several booklets in the mail that were aged with coffee. I love the look, and as a bonus, they also have a delicious smell that sticks with them for quite a long time. What could be better than that? For fun, I decided to do my own coffee staining:


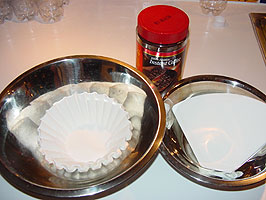
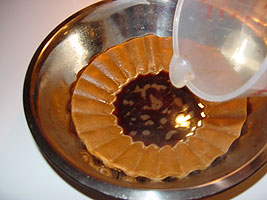
I'm going to try staining some coffee filters. Makes sense, right? Coffee filters are designed to hold up against hot water and soaking wet coffee grounds, so they should provide a sturdy surface for some paper projects. They're very absorbent, so they should be receptive to staining. Here, I've placed my two types of filters into stainless steel bowls. It's important to choose containers that will not be stained by a heavy dose of coffee---so, no clear plastic bowls!

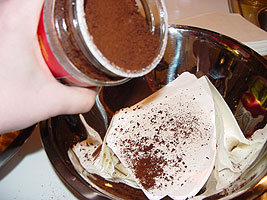
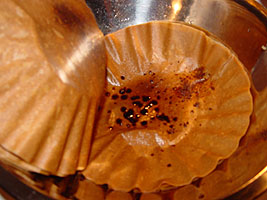
I'd like my finished papers to be speckled rather than solid, so maybe a little coffee sprinkling between layers will help this along. I do this randomly, since I have plenty of filters---there's no buying a small package of them.

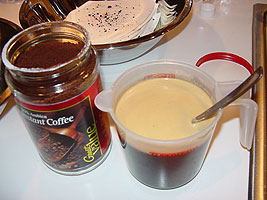
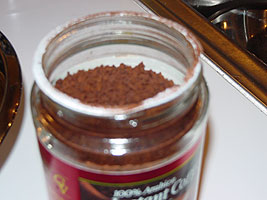
I chose a generic instant coffee for my experiment, in part because I'm not a coffee drinker, so there's no coffee pot available at my house. I heated two cups of water in the microwave for about three minutes, and than mixed in two heaping tablespoons of coffee.

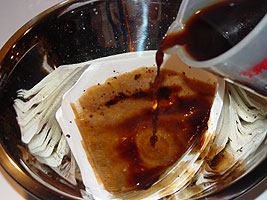
I poured the coffee onto the filters. Since I was hoping for uneven color, I just poured from the top, without worrying whether the coffee was penetrating all the layers. The two cups of coffee adequately covered my stack of filters. I let them sit for a few minutes, and then drained the excess coffee back into my mixing cup.

The excess coffee was poured over the second bowl of filters. These became completely saturated almost instantly. After I was finished, I wished that I had tucked some extra goodies between some of the layers. Tags might have been fun to age with this technique, or maybe a few ATC blanks. I'll have to remember that for next time.

The coffee I had sprinkled on the filters before pouring was dissolving and making some nice blotches. I sprinkled more here and there to encourage the variety.

All this coffee staining, and I still haven't even made a dent in my instant coffee! I have plenty left for later. Perhaps I'll pour some in a bowl and tuck it under my work table where my walnut crystal bowl is. I've had this bowl going for about a year now---I start with some walnut crystals and add water, then do whatever work that has to be done. When I'm finished, I simply tuck the bowl back under the work table, and let the water evaporate. When it's time for more walnut ink work, I just add a tiny bit of water, and scrub up the dark stains with a brush---instant walnut ink, with no waste. Maybe coffee will work the same way---I'll have to try it.

I squeezed the excess coffee out of the filters, and put them on paper towels on my garage floor to dry. Over the course of the next couple of days, I flipped them back and forth, and when they were dry enough to take some handling, I split them into small stacks to dry.

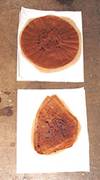
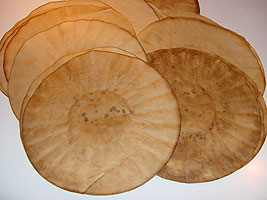
In a few days, I had this endless stack of stained filters. The round filters will make lovely background papers for collage. They tear nicely. However, they're still very absorbent, so rubber stamping on them takes a dry ink pad rather than a juicy one. The filters dried relatively flat, with little rippling.

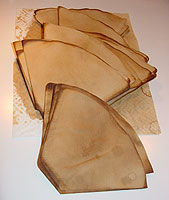
I also had this lovely stack of stained cone filters. Instant pockets! As a bonus, the paper towels I used beneath the filters while they were drying were also stained, so they're now in my stack of papers rather than in the trash. The cone filters did ripple a bit while they were drying, so next time, I'll try weighting them down to keep them flat.